What is YARA ?
- You can use the YARA integration with Wazuh to scan files added or modified on an endpoint for malware. YARA is a tool to detect and classify malware artifacts.
- Yara is an open source tool utilised by malware researcher to identify malware and to setup patterns that identify families of malware based on rules.
- These rules consist of a set of strings and expression which identifies the pattern, YARA rules can be used to perform signature based- detection of malwares.
- YARA rules are easy to write and understand, they have similar structure that looks like c language and it has predefined words in creating YARA rules.
Categories of Attacks in YARA
YARA rules can be designed to detect various categories of attacks.
Category | Types of Attack |
Anti-debug/Anti-VM | Anti-analysis techniques to avoid detection. |
Capabilities | Keylogging, network communication, etc. |
Malicious Documents | Macro malware, embedded exploits. |
Crypto | Ransomware, data encryption. |
Phishing, malicious attachments. |
Link:- https://github.com/Yara-Rules/rules?tab=readme-ov-file#capabilities
Hardware Requirement
Component | Requirement |
|---|---|
Processor | Multi-core processor, at least 2 GHz (Intel or AMD). |
Memory (RAM) | Minimum 2 GB for small environments, 4 GB or more recommended for larger environments and to handle intensive YARA scanning. |
Storage | At least 10 GB of free disk space for Wazuh agent installation and log storage. Additional space may be needed based on log retention policies. |
Operating System | Supports Linux, Windows, and Mac OS. |
Network | Stable network connection for communication between Wazuh agents and Wazuh manager. |
Different between WAZUH and YARA
Aspect | Wazuh | YARA |
Primary Function | Security Information and Event Management (SIEM) and Intrusion Detection System (IDS). | Malware identification and file scanning using custom rules. |
Role in Monitoring | Monitors directories and files for changes such as creation, modification, or deletion. | Scans files for malware based on custom rules when triggered by Wazuh's FIM module. |
Scanning Mechanism | Uses File Integrity Monitoring (FIM) to detect file changes and generate alerts. | Performs scans based on YARA rules to identify malicious files. |
Trigger Mechanism | Detects changes in monitored directories and files, triggering alerts and active responses. | Activated by Wazuh’s FIM alerts to scan specific files for malware using predefined YARA rules. |
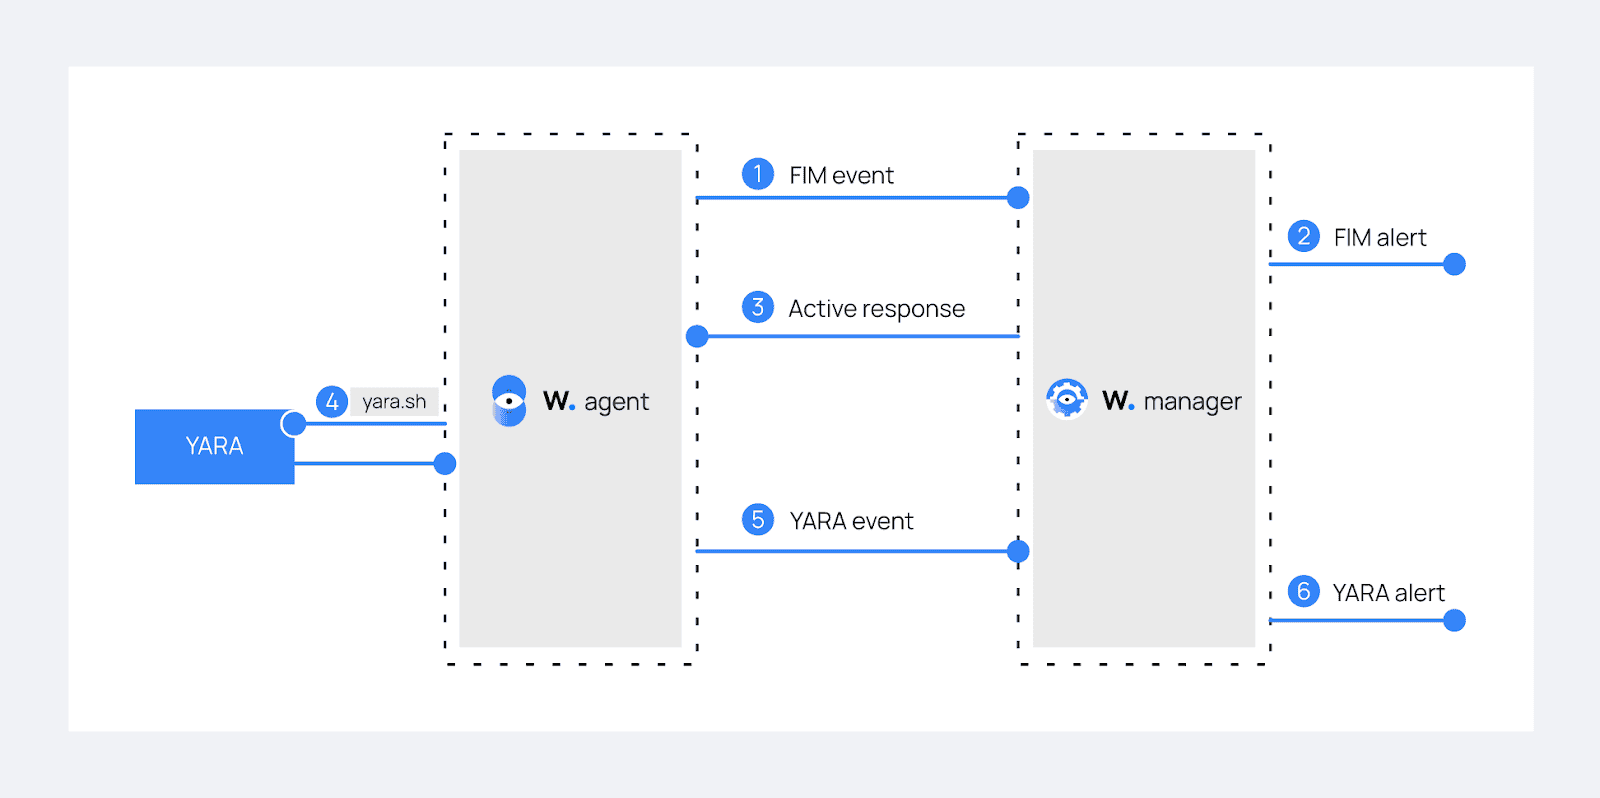
Architecture
Configuration for Linux
Linux endpoint :-
Perform the following steps to install YARA, and configure the active response and FIM modules.
Step: 1 Download, compile and install YARA:
linux Command:-

$sudo apt update

$sudo apt install -y make gcc autoconf libtool libssl-dev pkg-config jq

$sudo curl -LO https://github.com/VirusTotal/yara/archive/v4.2.3.tar.gz

$sudo tar -xvzf v4.2.3.tar.gz -C /usr/local/bin/ && rm -f v4.2.3.tar.gz

$cd /usr/local/bin/yara-4.2.3/

$sudo ./bootstrap.sh && sudo ./configure && sudo make && sudo make install && sudo make check
Step: 2 Test that YARA is running properly:
linux Command:-

$yara
If the error message below is displayed:
/usr/local/bin/yara: error while loading shared libraries: libyara.so.9: cannot open shared object file: No such file or directory.This means that the loader doesn’t find the libyara library usually located in /usr/local/lib. Add the /usr/local/lib path to the /etc/ld.so.conf loader configuration file to solve this:
linux Command:-

$sudo su

$echo "/usr/local/lib" >> /etc/ld.so.conf

$ldconfig
Step: 3 Download YARA detection rules:
linux Command:-

$sudo mkdir -p /tmp/yara/rules

$sudo curl 'https://valhalla.nextron-systems.com/api/v1/get' \
-H 'Accept: text/html,application/xhtml+xml,application/xml;q=0.9,*/*;q=0.8' \
-H 'Accept-Language: en-US,en;q=0.5' \
--compressed \
-H 'Referer: https://valhalla.nextron-systems.com/' \
-H 'Content-Type: application/x-www-form-urlencoded' \
-H 'DNT: 1' -H 'Connection: keep-alive' -H 'Upgrade-Insecure-Requests: 1' \
--data 'demo=demo&apikey=1111111111111111111111111111111111111111111111111111111111111111&format=text' \
-o /tmp/yara/rules/yara_rules.yar
Step: 4 Create a yara.sh script in the /var/ossec/active-response/bin/ directory. This is necessary for the Wazuh-YARA active response scans:
#!/bin/bash
# Wazuh - Yara active response
# Copyright (C) 2015-2022, Wazuh Inc.
#
# This program is free software; you can redistribute it
# and/or modify it under the terms of the GNU General Public
# License (version 2) as published by the FSF - Free Software
# Foundation.

#------------------------- Gather parameters -------------------------#
# Extra arguments
read INPUT_JSON
YARA_PATH=$(echo $INPUT_JSON | jq -r .parameters.extra_args[1])
YARA_RULES=$(echo $INPUT_JSON | jq -r .parameters.extra_args[3])
FILENAME=$(echo $INPUT_JSON | jq -r .parameters.alert.syscheck.path)
# Set LOG_FILE path
LOG_FILE="logs/active-responses.log"
size=0
actual_size=$(stat -c %s ${FILENAME})
while [ ${size} -ne ${actual_size} ]; do
   sleep 1
   size=${actual_size}
   actual_size=$(stat -c %s ${FILENAME})
done
#----------------------- Analyze parameters -----------------------#
if [[ ! $YARA_PATH ]] || [[ ! $YARA_RULES ]]
then
   echo "wazuh-yara: ERROR - Yara active response error. Yara path and rules parameters are mandatory." >> ${LOG_FILE}
   exit 1
fi
#------------------------- Main workflow --------------------------#
# Execute Yara scan on the specified filename
yara_output="$("${YARA_PATH}"/yara -w -r "$YARA_RULES" "$FILENAME")"
if [[ $yara_output != "" ]]
then
   # Iterate every detected rule and append it to the LOG_FILE
   while read -r line; do
       echo "wazuh-yara: INFO - Scan result: $line" >> ${LOG_FILE}
   done <<< "$yara_output"
fi
exit 0;
Step: 5. Change yara.sh file owner to root:wazuh and file permissions to 0750:
linux Command:-

$sudo chown root:wazuh /var/ossec/active-response/bin/yara.sh

$sudo chmod 750 /var/ossec/active-response/bin/yara.sh
Step: 6 Add the following within the <syscheck> block of the Wazuh agent /var/ossec/etc/ossec.conf configuration file to monitor the /tmp/yara/malware directory:
<directories realtime="yes">/tmp/yara/malware</directories>
<directories realtime="yes">/tmp/quarantined/</directories>
Step: 7 Restart the Wazuh agent to apply the configuration changes:
linux Command:-

$sudo systemctl restart wazuh-agent
Wazuh server :-
Step: 1 Add the following rules to the /var/ossec/etc/rules/local_rules.xml file. The rules detect FIM events in the monitored directory. They also alert when the YARA integration finds malware. You can modify the rules to detect events from other directories:
<group name="syscheck,">
 <rule id="100300" level="7">
   <if_sid>550</if_sid>
   <field name="file">/tmp/yara/malware/</field>
   <description>File modified in /tmp/yara/malware/ directory.</description>
 </rule>
 <rule id="100301" level="7">
   <if_sid>554</if_sid>
   <field name="file">/tmp/yara/malware/</field>
   <description>File added to /tmp/yara/malware/ directory.</description>
 </rule>
  <rule id="100302" level="7">
    <if_sid>550</if_sid>
    <field name="file">/tmp/quarantined/</field>
    <description>Malicious File modified in /tmp/quarantined/ directory.</description>
  </rule>
  <rule id="100303" level="7">
    <if_sid>554</if_sid>
    <field name="file">/tmp/quarantined/</field>
    <description>Malicious File added to /tmp/quarantined/ directory.</description>
  </rule>
</group>

<group name="yara,">
 <rule id="108000" level="0">
   <decoded_as>yara_decoder</decoded_as>
   <description>Yara grouping rule</description>
 </rule>
 <rule id="108001" level="12">
   <if_sid>108000</if_sid>
   <match>wazuh-yara: INFO - Scan result: </match>
   <description>File "$(yara_scanned_file)" is a positive match. Yara rule: $(yara_rule)</description>
 </rule>
</group>
Step: 2 Add the following decoders to the Wazuh server /var/ossec/etc/decoders/local_decoder.xml file. This allows extracting the information from YARA scan results:
<decoder name="yara_decoder">
 <prematch>wazuh-yara:</prematch>
</decoder>
<decoder name="yara_decoder1">
 <parent>yara_decoder</parent>
 <regex>wazuh-yara: (\S+) - Scan result: (\S+) (\S+)</regex>
 <order>log_type, yara_rule, yara_scanned_file</order>
</decoder>
Step: 3 Add the following configuration to the Wazuh server /var/ossec/etc/ossec.conf configuration file. This configures the active response module to trigger after the rule 100300 and 100301 are fired:
<ossec_config>
 <command>
   <name>yara_linux</name>
   <executable>yara.sh</executable>
   <extra_args>-yara_path /usr/local/bin -yara_rules /tmp/yara/rules/yara_rules.yar</extra_args>
   <timeout_allowed>no</timeout_allowed>
 </command>
 <active-response>
   <command>yara_linux</command>
   <location>local</location>
   <rules_id>100300,100301</rules_id>
 </active-response>
</ossec_config>
Step: 4 Restart the Wazuh manager to apply the configuration changes:
linux Command:-

$sudo systemctl restart wazuh-manager
Attack emulation :-
Step: 1 Create the script /tmp/yara/malware/malware_downloader.sh on the monitored endpoint to download malware samples:
#!/bin/bash
# Wazuh - Malware Downloader for test purposes
# Copyright (C) 2015-2022, Wazuh Inc.
#
# This program is free software; you can redistribute it
# and/or modify it under the terms of the GNU General Public
# License (version 2) as published by the FSF - Free Software
# Foundation.
function fetch_sample(){
 curl -s -XGET "$1" -o "$2"
}
echo "WARNING: Downloading Malware samples, please use this script with  caution."
read -p "  Do you want to continue? (y/n)" -n 1 -r ANSWER
echo
if [[ $ANSWER =~ ^[Yy]$ ]]
then
   echo
   # Mirai
   echo "# Mirai: https://en.wikipedia.org/wiki/Mirai_(malware)"
   echo "Downloading malware sample..."
   fetch_sample "https://wazuh-demo.s3-us-west-1.amazonaws.com/mirai" "/tmp/yara/malware/mirai" && echo "Done!" || echo "Error while downloading."
   echo
   # Xbash
   echo "# Xbash: https://unit42.paloaltonetworks.com/unit42-xbash-combines-botnet-ransomware-coinmining-worm-targets-linux-windows/"
   echo "Downloading malware sample..."
   fetch_sample "https://wazuh-demo.s3-us-west-1.amazonaws.com/xbash" "/tmp/yara/malware/xbash" && echo "Done!" || echo "Error while downloading."
   echo
   # VPNFilter
   echo "# VPNFilter: https://news.sophos.com/en-us/2018/05/24/vpnfilter-botnet-a-sophoslabs-analysis/"
   echo "Downloading malware sample..."
   fetch_sample "https://wazuh-demo.s3-us-west-1.amazonaws.com/vpn_filter" "/tmp/yara/malware/vpn_filter" && echo "Done!" || echo "Error while downloading."
   echo
   # Webshell
   echo "# WebShell: https://github.com/SecWiki/WebShell-2/blob/master/Php/Worse%20Linux%20Shell.php"
   echo "Downloading malware sample..."
   fetch_sample "https://wazuh-demo.s3-us-west-1.amazonaws.com/webshell" "/tmp/yara/malware/webshell" && echo "Done!" || echo "Error while downloading."
   echo
fi
Step: 2 Run the malware_downloader.sh script to download malware samples to the /tmp/yara/malware directory:
linux Command:-

$sudo bash /tmp/yara/malware/malware_downloader.sh
Visualise the Alerts :-
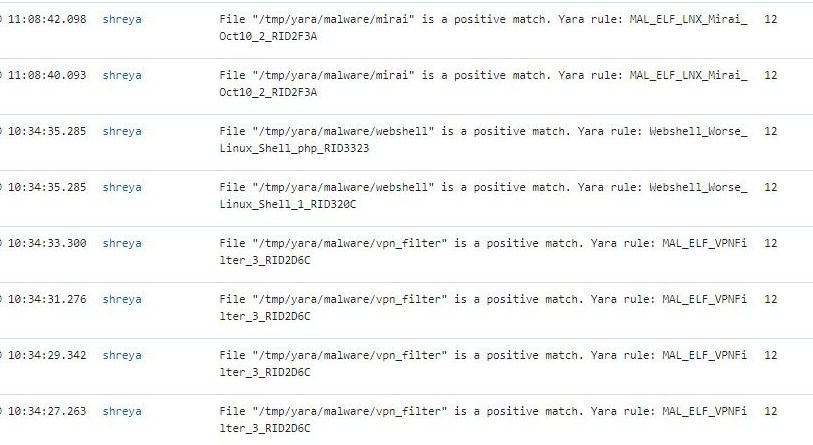
Detect Malcious File Uploads With Wazuh and Yara
This is a modified version of the script, now integrated into the active response on the Wazuh agent side. It includes a quarantine feature that moves detected files to a specified directory. By default, the directory used is /tmp/quarantined. Before running the script, ensure this directory is created, or feel free to modify the path to one of your choosing.
Key Script Details:
- Quarantine Directory:
/tmp/quarantined - LOG_FILE Path:
nano /var/ossec/active-response/bin/yara.sh
#!/bin/bash
# Wazuh - Yara active response
# Copyright (C) 2015-2022, Wazuh Inc.
#
# This program is free software; you can redistribute it
# and/or modify it under the terms of the GNU General Public
# License (version 2) as published by the FSF - Free Software
# Foundation.

#------------------------- Gather parameters -------------------------#

# Extra arguments
read INPUT_JSON
YARA_PATH=$(echo $INPUT_JSON | jq -r .parameters.extra_args[1])
YARA_RULES=$(echo $INPUT_JSON | jq -r .parameters.extra_args[3])
FILENAME=$(echo $INPUT_JSON | jq -r .parameters.alert.syscheck.path)

# Set LOG_FILE path
LOG_FILE="logs/active-responses.log"

# Set quarantine directory
QUARANTINE_DIR="/tmp/quarantined"

# Ensure quarantine directory exists
mkdir -p "$QUARANTINE_DIR"

size=0
actual_size=$(stat -c %s "$FILENAME")
while [ ${size} -ne ${actual_size} ]; do
    sleep 1
    size=${actual_size}
    actual_size=$(stat -c %s "$FILENAME")
done

#----------------------- Analyze parameters -----------------------#

if [[ ! $YARA_PATH ]] || [[ ! $YARA_RULES ]]
then
    echo "wazuh-yara: ERROR - Yara active response error. Yara path and rules parameters are mandatory." >> ${LOG_FILE}
    exit 1
fi

#------------------------- Main workflow --------------------------#

# Execute Yara scan on the specified filename
yara_output="$("${YARA_PATH}"/yara -w -r "$YARA_RULES" "$FILENAME")"

# If Yara rules are triggered, move file to quarantine directory
if [[ -n $yara_output ]]
then
    # Iterate every detected rule and append it to the LOG_FILE
    while read -r line; do
        echo "wazuh-yara: INFO - Scan result: $line" >> ${LOG_FILE}
    done <<< "$yara_output"

    # Move the file to quarantine directory
    mv "$FILENAME" "${QUARANTINE_DIR}/$(basename "$FILENAME")"
    echo "wazuh-yara: INFO - File quarantined: ${FILENAME}" >> ${LOG_FILE}
fi

exit 0;
Configuration for Windows
Windows endpoint:-
Configure Python and YARA:-
Perform the following steps to install Python, YARA, and download YARA rules.
Step: 1 Download Python executable installer from the official Python website.
Step: 2 Run the Python installer once downloaded and make sure to check the following boxes:
- Install launcher for all users
- Add Python 3.X to PATH. This places the interpreter in the execution path.
Step: 3 Download and install the latest Visual C++ Redistributable package.
Step: 4 Open PowerShell with administrator privileges to download and extract YARA:
Python Command:-

> Invoke-WebRequest -Uri https://github.com/VirusTotal/yara/releases/download/v4.2.3/yara-4.2.3-2029-win64.zip -OutFile v4.2.3-2029-win64.zip

> Expand-Archive v4.2.3-2029-win64.zip; Remove-Item v4.2.3-2029-win64.zip
Step: 5 Create a directory called C:\Program Files (x86)\ossec-agent\active-response\bin\yara\ and copy the YARA executable into it:
Python Command:-

> mkdir 'C:\Program Files (x86)\ossec-agent\active-response\bin\yara\'

> cp .\v4.2.3-2029-win64\yara64.exe 'C:\Program Files (x86)\ossec-agent\active-response\bin\yara\'
Step: 6 Install the valhallaAPI module:
Python Command:-

> pip install valhallaAPI
Step:7 Copy the following script and save it as download_yara_rules.py:
from valhallaAPI.valhalla import ValhallaAPI

v = ValhallaAPI(api_key="1111111111111111111111111111111111111111111111111111111111111111")
response = v.get_rules_text()

with open('yara_rules.yar', 'w') as fh:
    fh.write(response)
Step: 8 Run the following commands to download the rules and place them in the C:\Program Files (x86)\ossec-agent\active-response\bin\yara\rules\ directory:
Python Command:-

> python.exe download_yara_rules.py

> mkdir 'C:\Program Files (x86)\ossec-agent\active-response\bin\yara\rules\'

> cp yara_rules.yar 'C:\Program Files (x86)\ossec-agent\active-response\bin\yara\rules\'
Configure Active Response and FIM:-
Perform the steps below to configure the Wazuh FIM and an active response script for the detection of malicious files on the endpoint.
Step: 1 Create the yara.bat script in the C:\Program Files (x86)\ossec-agent\active-response\bin\ directory. This is necessary for the Wazuh-YARA active response scans:
@echo off

setlocal enableDelayedExpansion

reg Query "HKLM\Hardware\Description\System\CentralProcessor\0" | find /i "x86" > NUL && SET OS=32BIT || SET OS=64BIT


if %OS%==32BIT (
    SET log_file_path="%programfiles%\ossec-agent\active-response\active-responses.log"
)

if %OS%==64BIT (
    SET log_file_path="%programfiles(x86)%\ossec-agent\active-response\active-responses.log"
)

set input=
for /f "delims=" %%a in ('PowerShell -command "$logInput = Read-Host; Write-Output $logInput"') do (
    set input=%%a
)


set json_file_path="C:\Program Files (x86)\ossec-agent\active-response\stdin.txt"
set syscheck_file_path=
echo %input% > %json_file_path%

for /F "tokens=* USEBACKQ" %%F in (`Powershell -Nop -C "(Get-Content 'C:\Program Files (x86)\ossec-agent\active-response\stdin.txt'|ConvertFrom-Json).parameters.alert.syscheck.path"`) do (
set syscheck_file_path=%%F
)

del /f %json_file_path%
set yara_exe_path="C:\Program Files (x86)\ossec-agent\active-response\bin\yara\yara64.exe"
set yara_rules_path="C:\Program Files (x86)\ossec-agent\active-response\bin\yara\rules\yara_rules.yar"
echo %syscheck_file_path% >> %log_file_path%
for /f "delims=" %%a in ('powershell -command "& \"%yara_exe_path%\" \"%yara_rules_path%\" \"%syscheck_file_path%\""') do (
    echo wazuh-yara: INFO - Scan result: %%a >> %log_file_path%
)

exit /b
Step: 2 Add the C:\Users\<USER_NAME>\Downloads directory for monitoring within the <syscheck> block in the Wazuh agent configuration file C:\Program Files (x86)\ossec-agent\ossec.conf. Replace <USER_NAME> with the username of the endpoint:
<directories realtime="yes">C:\Users\<USER_NAME>\Downloads</directories>Step: 3 Restart the Wazuh agent to apply the configuration changes:
Python Command:-

> Restart-Service -Name wazuh
Wazuh Server:-
Perform the following steps on the Wazuh server. This allows alerting for changes in the endpoint monitored directory and configuring an active response script to trigger whenever it detects a suspicious file.
Step: 1 Add the following decoders to the Wazuh server /var/ossec/etc/decoders/local_decoder.xml file. This allows extracting the information from YARA scan results:
<decoder name="yara_decoder">
    <prematch>wazuh-yara:</prematch>
</decoder>

<decoder name="yara_decoder1">
    <parent>yara_decoder</parent>
    <regex>wazuh-yara: (\S+) - Scan result: (\S+) (\S+)</regex>
    <order>log_type, yara_rule, yara_scanned_file</order>
</decoder>
Step: 2 Add the following rules to the Wazuh server /var/ossec/etc/rules/local_rules.xml file. The rules detect FIM events in the monitored directory. They also alert when malware is found by the YARA integration:
<group name="syscheck,">
  <rule id="100303" level="7">
    <if_sid>550</if_sid>
    <field name="file">C:\\Users\\<USER_NAME>\\Downloads</field>
    <description>File modified in C:\Users\<USER_NAME>\Downloads directory.</description>
  </rule>
  <rule id="100304" level="7">
    <if_sid>554</if_sid>
    <field name="file">C:\\Users\\<USER_NAME>\\Downloads</field>
    <description>File added to C:\Users\<USER_NAME>\Downloads  directory.</description>
  </rule>
</group>

<group name="yara,">
  <rule id="108000" level="0">
    <decoded_as>yara_decoder</decoded_as>
    <description>Yara grouping rule</description>
  </rule>

  <rule id="108001" level="12">
    <if_sid>108000</if_sid>
    <match>wazuh-yara: INFO - Scan result: </match>
    <description>File "$(yara_scanned_file)" is a positive match. Yara rule: $(yara_rule)</description>
  </rule>
</group>
Step: 3 Add the following configuration to the Wazuh server /var/ossec/etc/ossec.conf file:
<ossec_config>
  <command>
    <name>yara_windows</name>
    <executable>yara.bat</executable>
    <timeout_allowed>no</timeout_allowed>
  </command>

  <active-response>
    <command>yara_windows</command>
    <location>all</location>
    <rules_id>100303,100304</rules_id>
  </active-response>
</ossec_config>
Step: 4 Restart the Wazuh manager to apply the configuration changes:
Command:-

$sudo systemctl restart wazuh-manager
Attack emulation:-
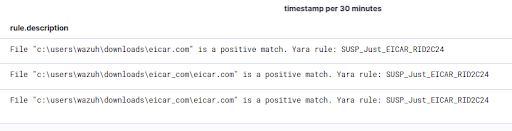
Download a malware sample on the monitored Windows endpoint:
Step: 1 Turn off Microsoft Virus and threat protection.
Step: 2 Download the EICAR zip file:
Invoke-WebRequest -Uri https://secure.eicar.org/eicar_com.zip -OutFile eicar.zipStep: 3 Unzip it:
Python Command:-

> Expand-Archive .\eicar.zip
Step: 4 Copy the EICAR file to the monitored directory:
Python Command:-

> cp .\eicar\eicar.com C:\Users\<USER_NAME>\Downloads
Visualize the alerts:-
Conclusion
In conclusion, integrating YARA with Wazuh significantly enhances your security posture by enabling advanced malware detection through custom rules. By leveraging Wazuh’s File Integrity Monitoring (FIM) and YARA’s powerful pattern-matching capabilities, you can effectively monitor and respond to potential threats across both Linux and Windows environments. The combination of these tools allows for a proactive approach to cybersecurity, ensuring that your systems are continuously monitored and protected against a wide range of malicious activities. Whether you're a security professional or a system administrator, the steps outlined in this guide provide a solid foundation for implementing YARA and Wazuh in your security strategy, enabling you to stay ahead of emerging threats.

Share