Overview:
In this blog, we will explore the process of moving the Wazuh Indexer to a new disk after running out of storage in both single-node and multi-node cluster environments. We will also cover how to add additional storage in AWS Lightsail, mount the new disk in a Linux environment, and then migrate the Wazuh Indexer directory to the new storage. Whether you're working in a standalone or clustered Wazuh setup, this guide will provide detailed, step-by-step instructions to help you efficiently manage your storage resources and avoid potential downtime.
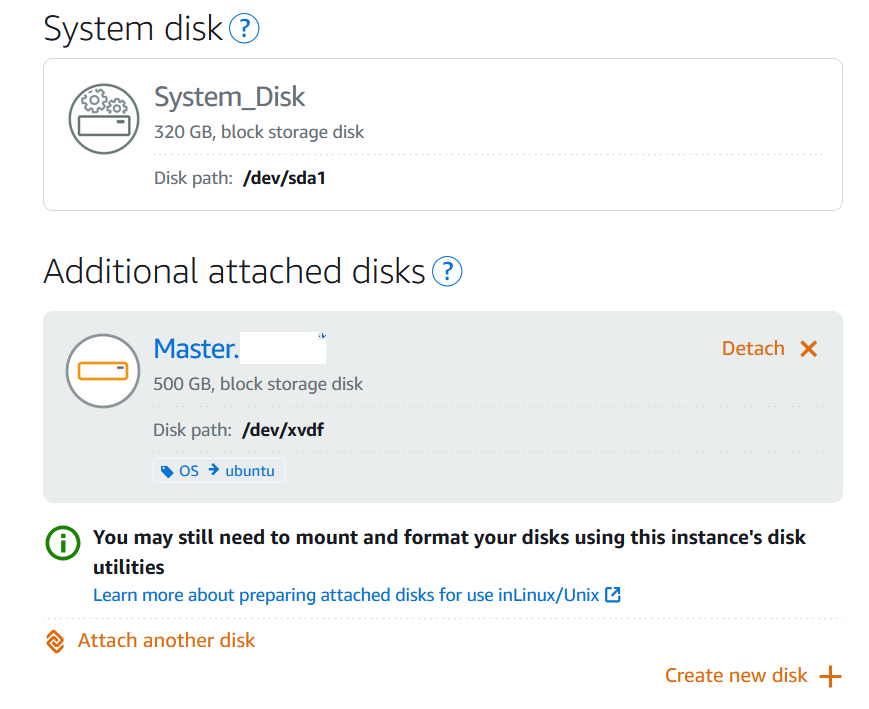
Adding and Mounting Lightsail Block Storage to Linux Instances
- From the Lightsail homepage, navigate to the Storage section.
- Click on Create Disk.
- Select the appropriate AWS Region and Availability Zone where your Lightsail instance is hosted.
- Specify the desired disk size.
- Enter a unique name for your disk.
- Resource naming guidelines:
- Must be unique within each AWS Region for your Lightsail account.
- Should be between 2 to 255 characters long.
- Must begin and end with an alphanumeric character.
- Can include letters, numbers, periods, dashes, and underscores.
- Resource naming guidelines:
- Select one of the following options to assign tags to your disk:
Add or edit key-only tags (if tags are already present). Input your new tag into the tag key text box and press Enter. When finished, click Save to apply the tags, or click Cancel if you choose not to add them.

Create a key-value tag by entering a key in the Key text box and a value in the Value text box. Once you've added your tag, click Save to apply it, or Cancel if you choose not to add the tag.
Key-value tags must be added individually before saving. To add multiple tags, repeat the process for each one.

- Click on Create Disk. After a few moments, your disk will be created, and you'll be redirected to the new disk management page.
- Select your instance from the list, then click Attach to connect the new disk to your instance.
Connect to Your Instance to Format and Mount the Disk
After you create and attach your disk, go back to the instance management page in Lightsail.The Connect tab is displayed by default.
- Select Connect using SSH to access your instance.
Input the following command in the terminal window:
lsblkThe output of
lsblkomits the/dev/prefix from disk paths.Current Generation Instances :-
In the example output below, the root volume (nvme0n1) contains two partitions (nvme0n1p1 and nvme0n1p128), whereas the additional volume (nvme1n1) has no partitions.
[ec2-user ~]$ sudo lsblk
NAME          MAJ:MIN RM SIZE RO TYPE MOUNTPOINT
nvme1n1       259:0    0  30G  0 disk /data
nvme0n1       259:1    0  16G  0 disk
└─nvme0n1p1   259:2    0   8G  0 part /
└─nvme0n1p128 259:3    0   1M  0 part
Decide if you need to create a file system on the disk. New disks are raw block devices and require a file system before they can be mounted and used. Disks restored from snapshots may already have a file system. Be cautious—creating a new file system on a disk that already has one will overwrite your existing data.
Use the following instructions to check if your disk has a file system. If it doesn’t, proceed to Step 2.5. If it does, skip ahead to Step 2.6.
Current Generation Instances :-
sudo file -s /dev/nvme1n1You should see the following output on a brand new disk.
/dev/nvme1n1: dataIf you see output like the following, it means that your disk already has a file system.
/dev/nvme1n1: SGI XFS filesystem data (blksz 4096, inosz 512, v2 dirs)Run the following command to create a new file system on the disk, replacing device_name (e.g., /dev/nvme1n1) with the actual device name. Depending on your application's needs or your operating system's limitations, you can select a different file system type, such as ext3 or ext4.
Current Generation Instances :-
sudo mkfs -t xfs device_nameYou should see output like the following.
meta-data=/dev/nvme1n1           isize=512    agcount=16, agsize=1048576 blks
         =                       sectsz=512   attr=2, projid32bit=1
         =                       crc=1        finobt=1, sparse=1, rmapbt=0
         =                       reflink=1    bigtime=1 inobtcount=1
data     =                       bsize=4096   blocks=16777216, imaxpct=25
         =                       sunit=1      swidth=1 blks
naming   =version 2              bsize=4096   ascii-ci=0, ftype=1
log      =internal log           bsize=4096   blocks=16384, version=2
         =                       sectsz=512   sunit=1 blks, lazy-count=1
realtime =none                   extsz=4096   blocks=0, rtextents=0
Run the following command to create a directory that will serve as the mount point for the disk. The mount point is the location within the file system where the disk will be accessed, allowing you to read and write files after the disk is mounted. Replace mount_point with a suitable path, such as an unused directory like
/data.sudo mkdir mount_pointYou can confirm that the disk now has a file system by running the following command.
Current Generation Instances :-
sudo file -s /dev/nvme1n1You will see output similar to the following, instead of
/dev/nvme1n1: data./dev/nvme1n1: SGI XFS filesystem data (blksz 4096, inosz 512, v2 dirs)Lastly, use the following command to mount the disk.
sudo mount device_name mount_point
Ensure the Disk is Automatically Mounted on Instance Reboot
You’ll likely want to mount this disk automatically every time your Lightsail instance reboots. However, if that’s not necessary for your setup, this step is optional.
To ensure the disk is mounted automatically on every system reboot, add an entry for the device in the
/etc/fstabfile.It's recommended to create a backup of your
/etc/fstabfile beforehand, so you have a recovery option in case the file is accidentally damaged or deleted during the editing process.sudo cp /etc/fstab /etc/fstab.orig- Use a text editor, like
vim, to open the/etc/fstabfile. Ensure you includesudobefore the command to have the necessary permissions to save any changes. Append a new line at the end of the file for your disk using the following format.
device_name mount_point file_system_type fs_mntops fs_freq fs_passnoFor instance, your updated line could look something like this.
Current Generation Instances :-
/dev/nvme1n1 /data xfs defaults,nofail 0 2- Save the file and close the text editor.
Stop Wazuh Services and Transfer Data
Shut down the Wazuh indexer and associated services before moving the data to the new directories:
- Pause indexing and initiate a flush operation.
curl -X POST "https://<indexer_IP>:9200/_flush/synced" -u <username>:<password> -k- Stop the Filebeat service.
systemctl stop filebeat- Shut down the Wazuh indexer.
systemctl stop wazuh-indexer- Move or copy data to the new directories and change ownership.
mv /var/lib/wazuh-indexer/ /mnt/<new_folder_lib>/
mv /var/log/wazuh-indexer/ /mnt/<new folder_log>/
chown wazuh-indexer:wazuh-indexer -R /mnt/<new_folder_lib>/
chown wazuh-indexer:wazuh-indexer -R /mnt/<new folder_log>/
Modify the Configuration of the Wazuh Indexer
Modify the Wazuh indexer configuration file located at
/etc/wazuh-indexer/opensearch.ymlto updatepath.dataandpath.logswith the new partitions.path.data: /mnt/<new_folder_lib>/wazuh-indexer path.logs: /mnt/<new folder_log>/wazuh-logs- Edit the Wazuh indexer configuration file located at
/etc/wazuh-indexer/jvm.optionsand update the parameters--XX:HeapDumpPath=,-XX:ErrorFile=, andsafepoint:file=to reflect the new partitions. - Add
Goto the/etc/wazuh-indexer/jvm.optionsfile.Modify the
--XX:HeapDumpPath=setting and update this field accordingly.-XX:HeapDumpPath=/data/lib/wazuh-indexerUpdate the
-XX:ErrorFile=parameter and make changes to this field.-XX:ErrorFile=/data/log/wazuh-indexer/hs_err_pid%p.logUpdate the
safepoint:file=entry and modify this field.safepoint:file=/var/log/wazuh-indexer/gc.log
- Restart the Wazuh services now.
systemctl daemon-reload
systemctl enable wazuh-indexer
systemctl start wazuh-indexer
systemctl restart filebeat
Conclusion:
In conclusion, this process involves making necessary changes to the Wazuh indexer configuration files, updating paths for new partitions, and restarting the required services to ensure the system operates with the updated configurations. Following these steps ensures smooth functioning and proper file handling in the new disk setup.

Shrey Shah, SOC Analyst, adept in monitoring network traffic, collaborating to enhance security. Advanced Diploma in Cyber Security, 1 year as Junior Pen Tester at Aarvi Technology.
Share