DFIR-IRIS configuration.
- Configuration of this kind of platform is hectic right, but don’t worry I have given complete and easy configuration with detailed step’s. But first let’s understand what is actually IRIS.
What is DFIR-IRIS?
- DFIR-IRIS (Digital Forensics and Incident Response - Incident Response & Intelligence System) is an open-source tool designed to support digital forensics and incident response efforts. This platform offers a wide array of features to help organizations effectively handle and investigate cybersecurity incidents. Some of the primary components and functionalities of DFIR-IRIS include:-
- Case Management.
- Artifact Management.
- Automation and Orchestration.
- Collaboration.
- Reporting.
- Threat Intelligence Integration.
- IRIS relies on :
- Flask for the web engine
- SQLAlchemy and PostgresSQL for the database
- RabbitMQ for the jobs processing
- Nginx for the reverse proxy
Prerequisite:-
- To deploy and operate DFIR-IRIS efficiently, certain system and software prerequisites need to be fulfilled. Below are the standard requirements for DFIR-IRIS:
- System Prerequisites:-
- Hardware:
- CPU: Multi-core processor (quad-core or higher recommended).
- Memory: At least 8Gb of RAM (16 GB or more recommended for large-scale deployments).
- Storage: Solid State Drive (SSD) with sufficient capacity (minimum of 500 GB, more if storing large volumes of data).
- Operating System:
- Linux distributions such as Ubuntu, CentOS 7 or other compatible distributions.
- Hardware:
- Software Requirements:-
- Database:
- PostgreSQL 10 or later.
- Web Server:
- Apache HTTP Server 2.4 or later.
- Nginx (optional, as a reverse proxy or for load balancing).
- Programming Languages and Dependencies:
- Python 3.6 or later.
- Required Python packages (installable via pip).
- Additional Software:
- Git (for source code management).
- Docker and Docker Compose (for containerized deployment).
- RabbitMQ (for message brokering).
- Redis (for caching and message brokering).
- Database:
How to install DFIR-IRIS.
Installing DFIR IRIS involves several steps to ensure all components are correctly set up and configured. But before that let’s under one another main component of IRIS which simplify the configuration of DFIR-IRIS i.e Docker and with the help of 5 Docker services working of IRIS is made easy.
- app - iris_webapp: The core, including web server, DB management, module management etc.
- db: A PostgresSQL database.
- RabbitMQ: A RabbitMQ engine to handle jobs queuing and processing.
- worker: Jobs handler relying on RabbitMQ.
- nginx: A NGINX reverse proxy.
 You have to configure Docker in your system before trying to configure DFIR-IRIS.
- Installation of Docker
- You will get easy and complete installation of Docker here within few steps but To install Docker Engine, you'll need a 64-bit version of one of the following Ubuntu distributions:
- Ubuntu Noble 24.04 (LTS)
- Ubuntu Jammy 22.04 (LTS)
- Ubuntu Focal 20.04 (LTS)
- Docker Engine supports Ubuntu on x86_64 (also known as amd64), armhf, arm64, s390x, and ppc64le (or ppc64el) architectures. Here we will install docker using apt repository.
For installing Docker Engine on a new host machine for the first time, you’ll first have to set up the Docker repository. Then you can install Docker.
Step-1: Setting up Docker's apt repository.
sudo apt-get update
sudo apt-get install ca-certificates curl
sudo install -m 0755 -d /etc/apt/keyrings
sudo curl -fsSL https://download.docker.com/linux/ubuntu/gpg -o /etc/apt/keyrings/docker.asc
sudo chmod a+r /etc/apt/keyrings/docker.asc
- This set of commands will set up Docker’s official GPG key.
Step-2: Install the Docker packages.
sudo apt-get install docker-ce docker-ce-cli containerd.io docker-buildx-plugin docker-compose-plugin - This Command will install the latest version of Docker to your system.
Step-3: Running hello-world image to check docker.
sudo docker run hello-world - This command retrieves a test image and executes it in a container. Once the container is up and running, it displays a confirmation message and then shuts down.
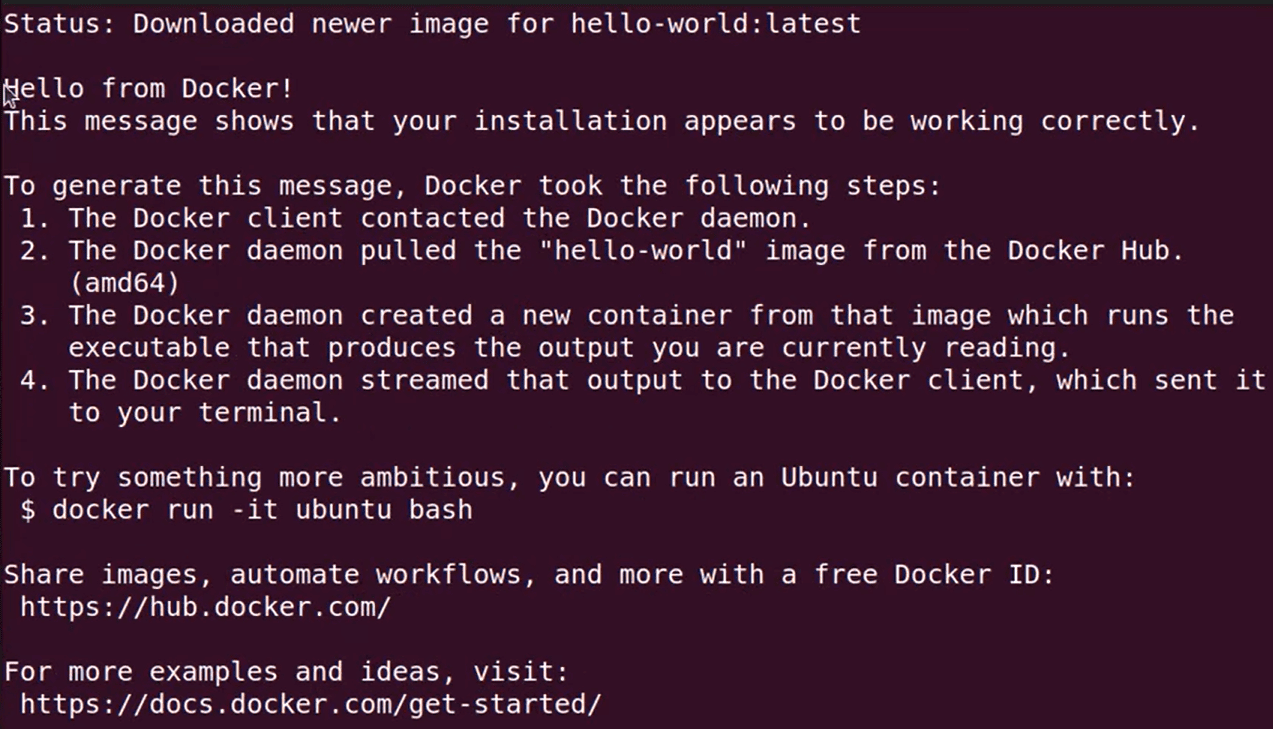
- This steps will install a fully functioning Docker Engine in your system that we’ll need to install DFIR-IRIS.
- You will get easy and complete installation of Docker here within few steps but To install Docker Engine, you'll need a 64-bit version of one of the following Ubuntu distributions:
Now here's a detailed step-by-step guide to install DFIR-IRIS:
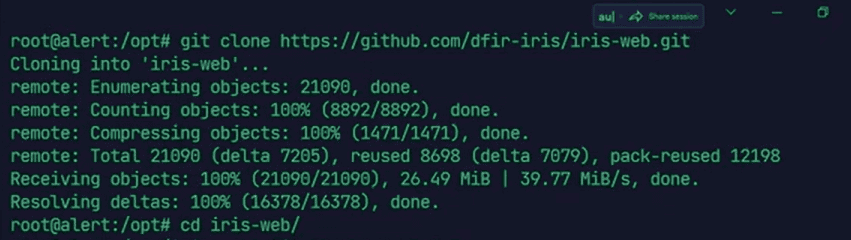
Step-1 : Clone the iris-web repository.
git clone https://github.com/dfir-iris/iris-web.git
cd iris-web
- This step will clone DFIR-IRIS from iris repository, and will make a directory named iris-web.
Step-2 : Checkout to the last non-beta tagged version.
git checkout v2.4.11 - This step is to check the version of iris.

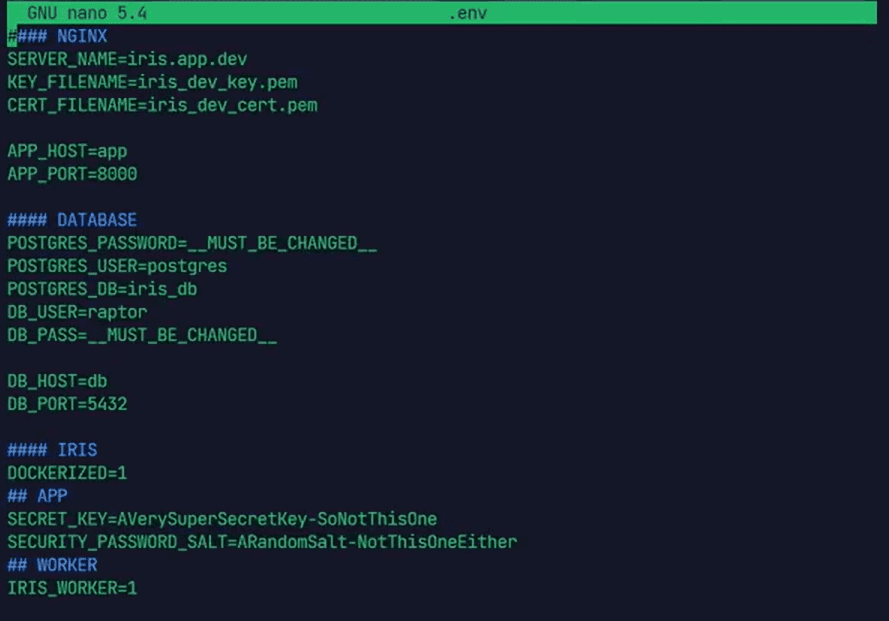
Step-3: Copy the environment file.
cp .env.model .env - This step is to set up the environment settings. After copying the .env file, open it and you must change POSTGRES_PASSWORD, DG_PASS, SECURITY_KEY, SECURITY_PASSWORD_SALT. You should change these settings according to you.
Step-4: Docker compose build.
- Remember before performing this step you have to make sure you are in the same file where your .env file is there and you have docker per-installed.
docker compose build Step-5: Start IRIS.
docker compose up - After this step the IRIS is up and running.
All this steps were for installation, Once installed, DFIR-IRIS requires some configuration to tailor it to your specific needs:
- Access the Web Interface: Open a web browser and navigate to the DFIR IRIS login page, typically at http://your-server-ip/login.
 You’ll see this login page.
- How to get login credentials: By default an administrator account is created and you will have to get the password of that account manually from the logs by searching for "WARNING :: post_init :: create_safe_admin :: >>>” in the logs.

Or you can also use this command to find this line.
docker compose logs app | grep 'admin' To set an admin password during the initial startup, you can specify the environment variable IRIS_ADM_PASSWORD in the .env file. Note that this variable will be ignored once the administrator account has been established.
- Create Admin Account: During the first login, create an admin account to manage the platform with all the access controls of IRIS.
- Add Customers: DFIR IRIS can handle multiple customers. Begin by adding customer profiles, which will serve as containers for different cases.
- Create Cases: Within each customer profile, create cases based on the severity of alerts, context, incident response policies, and other criteria.
- Configure Alerts and Automations: Set up alerts and automate responses using playbooks to streamline incident management.
- Integrate with Other Tools: DFIR IRIS integrates with various security tools and platforms like SIEMs, EDR solutions, and threat intelligence platforms. Configure these integrations to enhance your incident response capabilities.
After all these steps you will have a fully working DFIR IRIS.
WAZUH and DFIR-IRIS integration.
- By integrating DFIR-IRIS with the Wazuh XDR and SIEM platform, security monitoring and incident response become more efficient and cohesive. This connection enables incident response teams to correlate security events, oversee investigation developments, and coordinate response efforts seamlessly.
- I assume you have a fully working WAZUH Server, Indexer and Dashboard, For WAZUH IRIS integration you have to prepare WAZUH and IRIS both individually. Let’s first see what we have to do on the IRIS side.
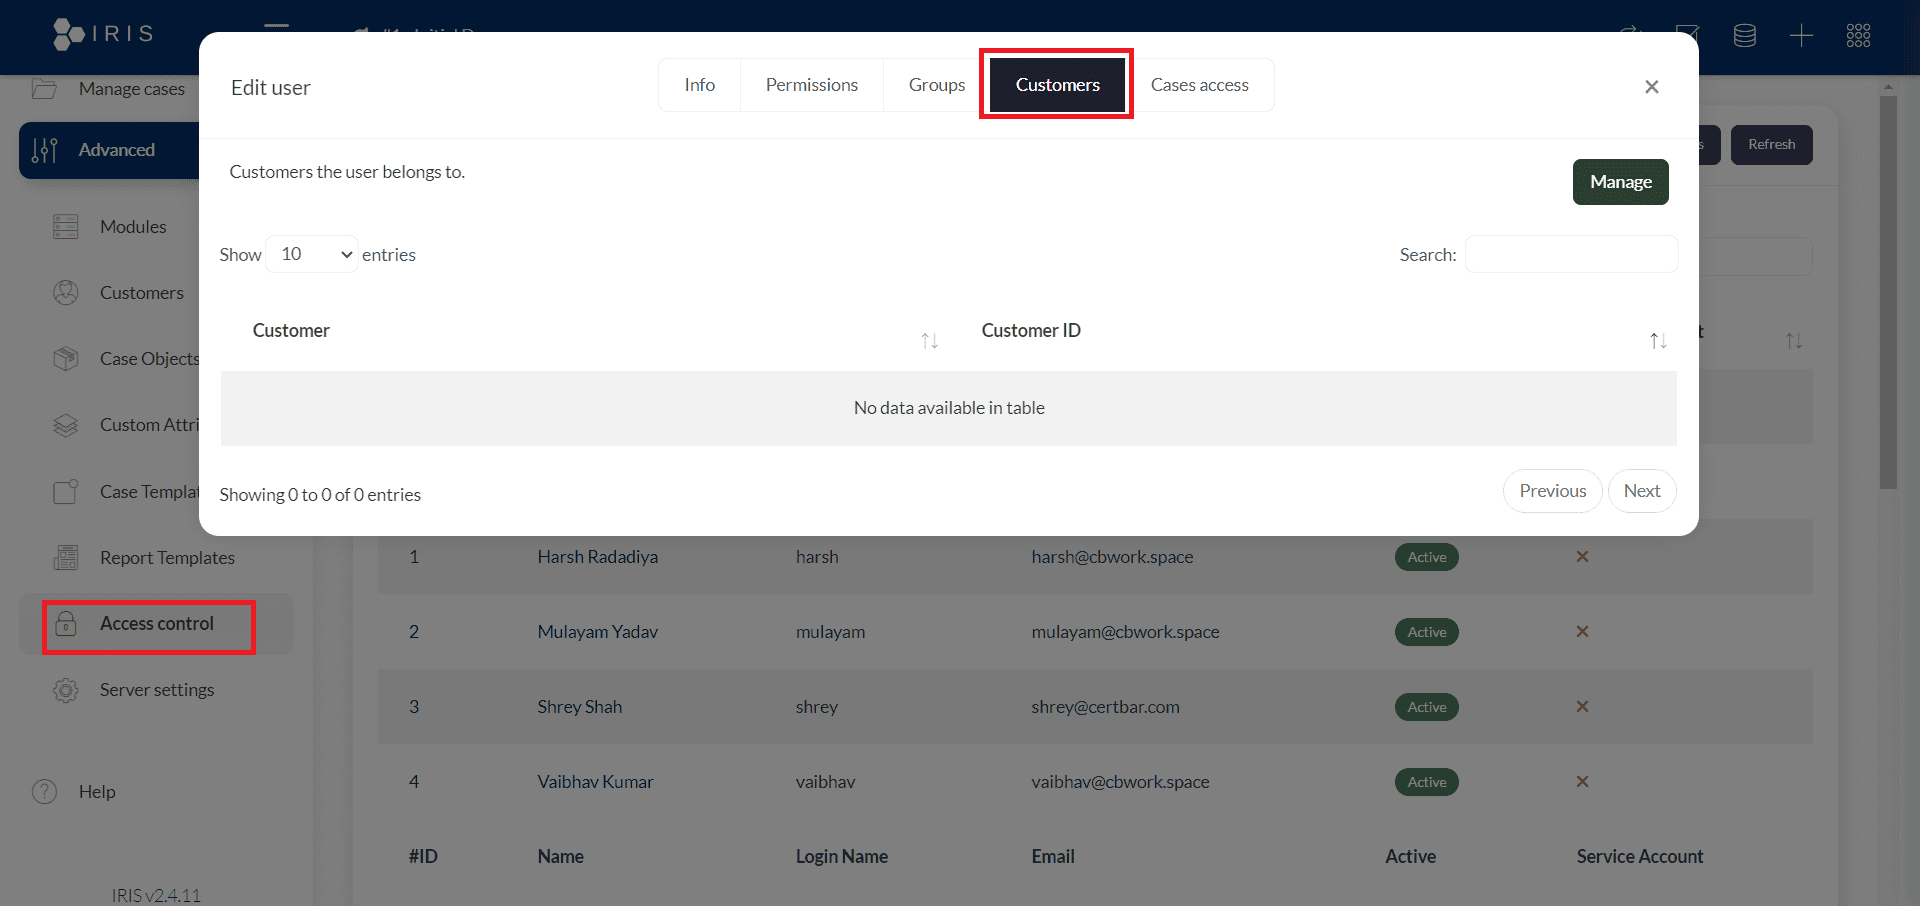
All these steps should be done through an administrator account. So now, Assign your IRIS user to the customer for whom you're processing alerts. Go to Advanced > Access control, and choose the user you want to associate with the customer account. In the pop-up window, click on the Customers tab, then click Manage. Add the desired customer to the selected user, and hit Save.
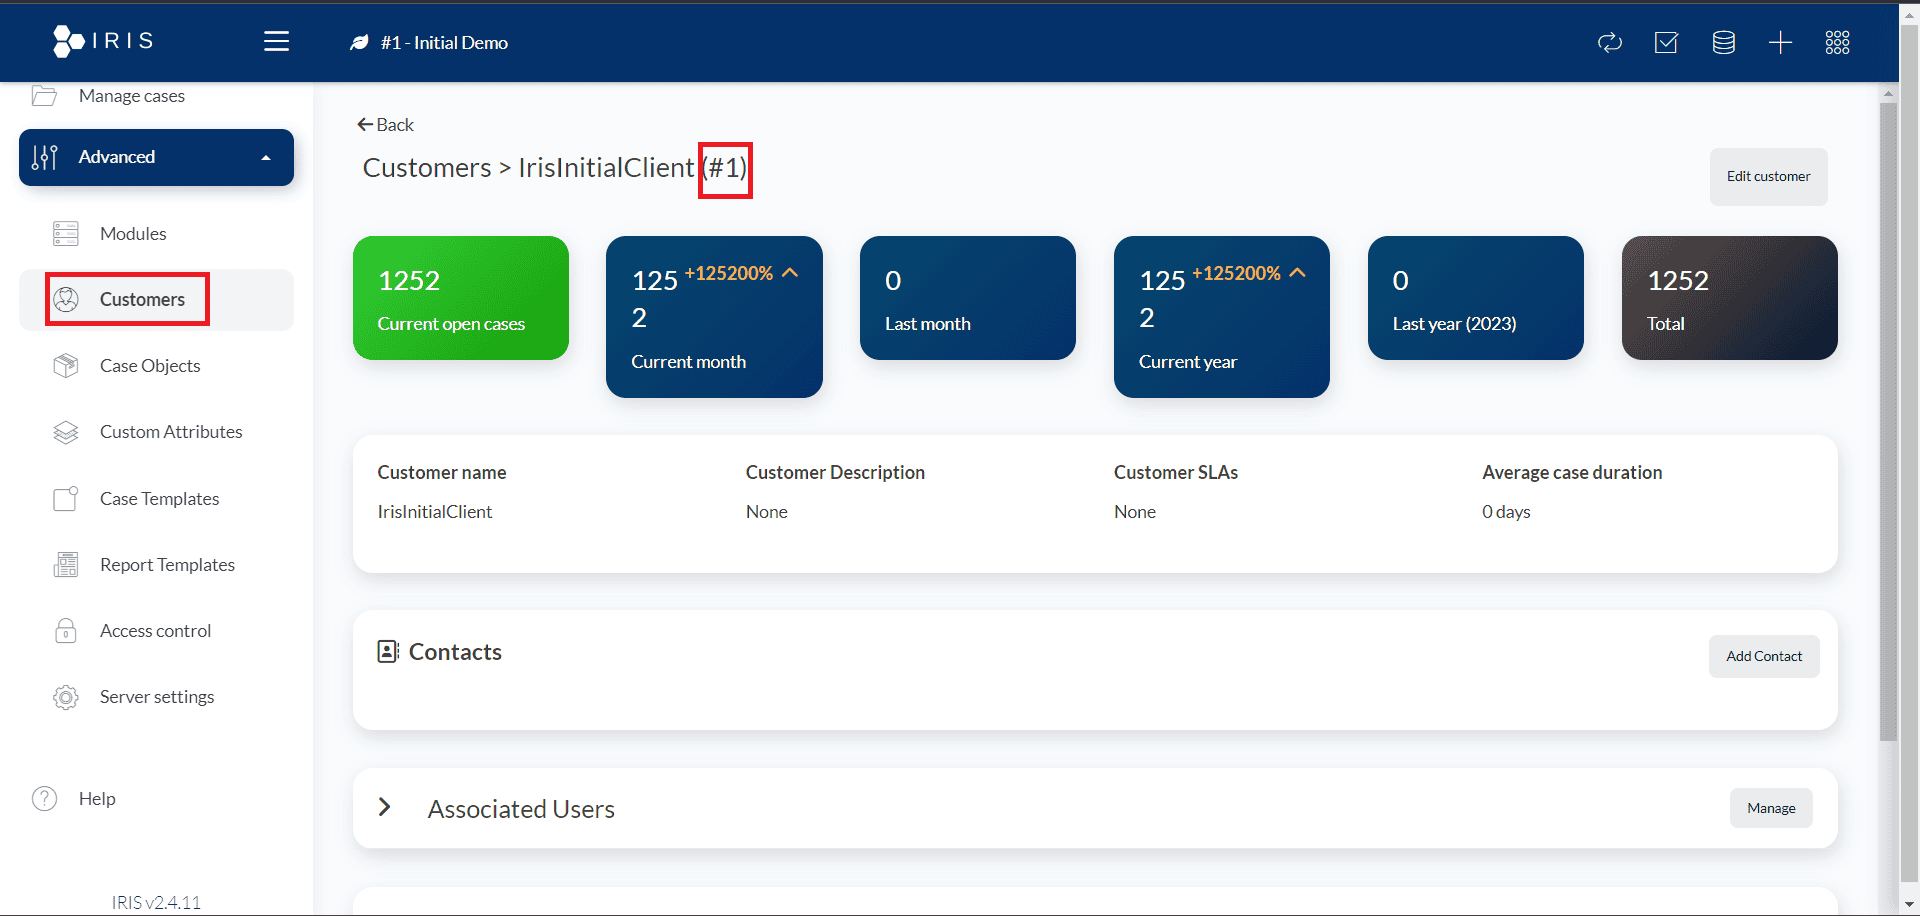
Locate your customer ID by going to Advanced > Customers, and choose the customer you wish to integrate. Record the customer ID shown at the top of the page, as you will need it when setting up the Wazuh server. The customer ID in the image below is 1.
Retrieve the API key for the current DFIR-IRIS user by clicking on the username and choosing My settings. Now you will be able to see the API key.
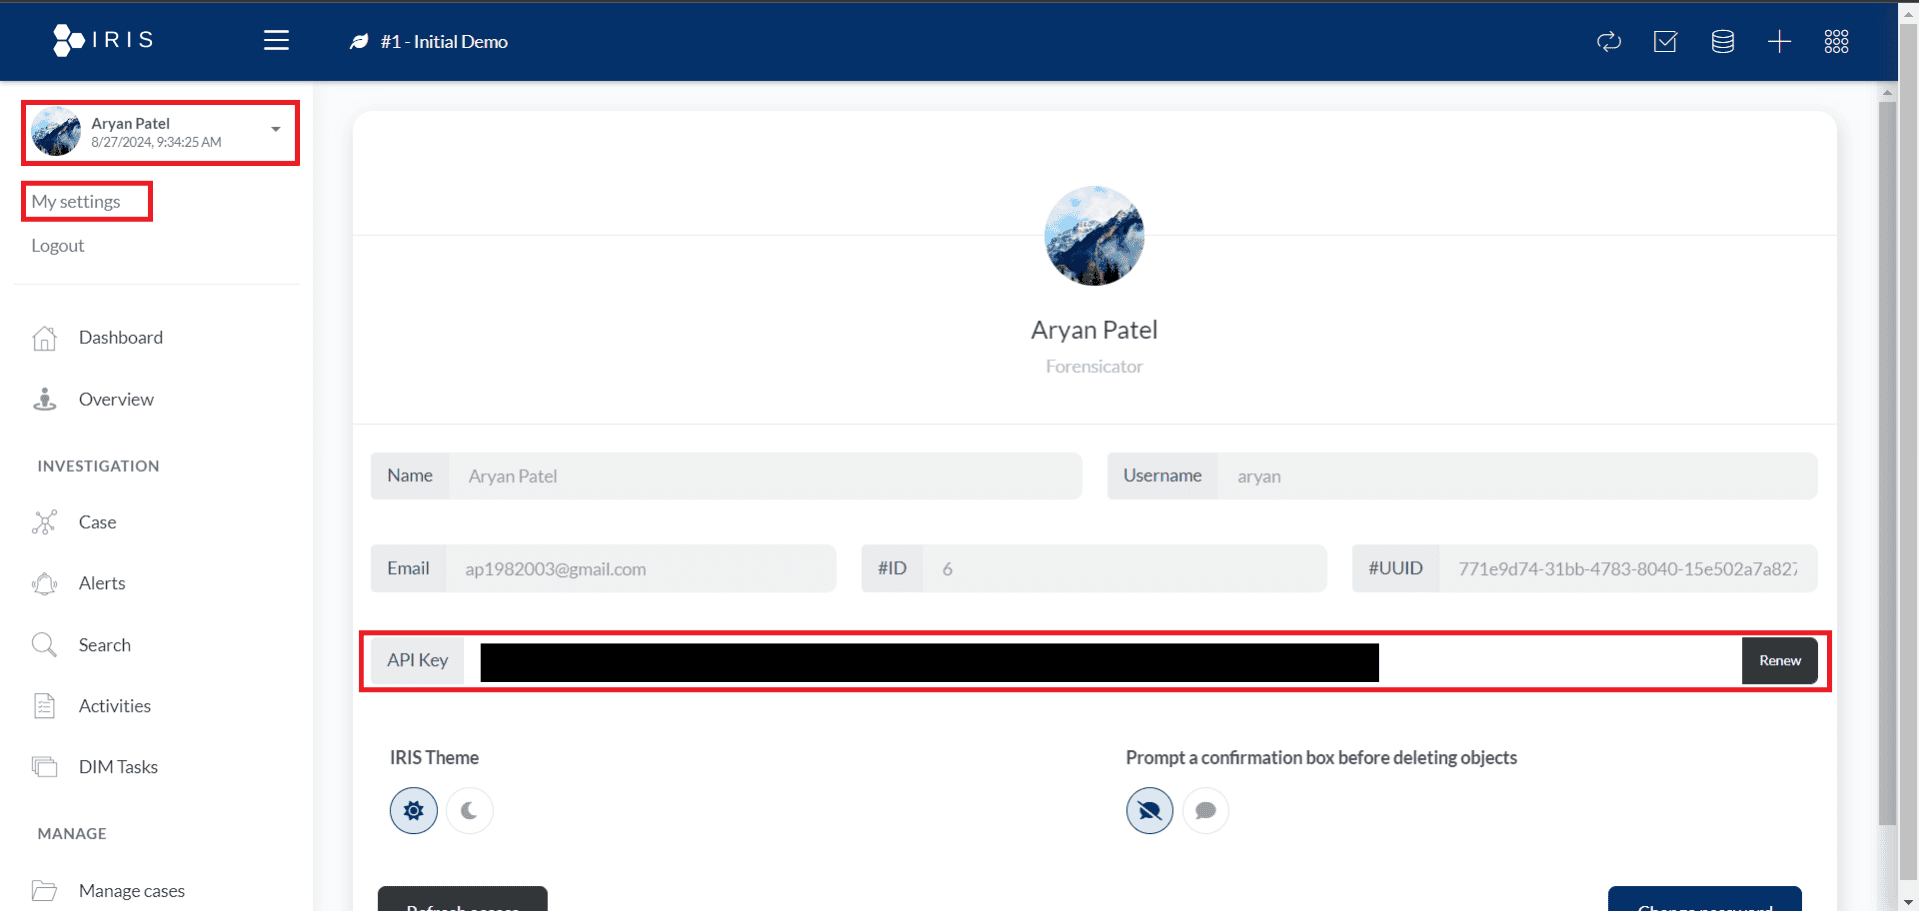
Now copy this API key and keep it safe as you will need it while integrating the Wazuh server.
Now let’s see what configuration we have to do on the Wazuh server side.
Step-1: First you have to create a script in file location /var/ossec/integrations/custom-wazuh_iris.py where you have to write following content to forward alerts to DFIR-IRIS.
#!/var/ossec/framework/python/bin/python3
# custom-wazuh_iris.py
# Custom Wazuh integration script to send alerts to DFIR-IRIS
import sys
import json
import requests
import logging
from datetime import datetime
# Configure logging
logging.basicConfig(filename='/var/ossec/logs/integrations.log', level=logging.INFO,
format='%(asctime)s %(levelname)s: %(message)s', datefmt='%Y-%m-%d %H:%M:%S')
# Function to create a formatted string from alert details
def format_alert_details(alert_json):
rule = alert_json.get("rule", {})
agent = alert_json.get("agent", {})
# Extracting MITRE information from the nested 'rule' structure
mitre = rule.get("mitre", {})
mitre_ids = ', '.join(mitre.get("id", ["N/A"]))
mitre_tactics = ', '.join(mitre.get("tactic", ["N/A"]))
mitre_techniques = ', '.join(mitre.get("technique", ["N/A"]))
details = [
f"Rule ID: {rule.get('id', 'N/A')}",
f"Rule Level: {rule.get('level', 'N/A')}",
f"Rule Description: {rule.get('description', 'N/A')}",
f"Agent ID: {agent.get('id', 'N/A')}",
f"Agent Name: {agent.get('name', 'N/A')}",
f"MITRE IDs: {mitre_ids}",
f"MITRE Tactics: {mitre_tactics}",
f"MITRE Techniques: {mitre_techniques}",
f"Location: {alert_json.get('location', 'N/A')}",
f"Full Log: {alert_json.get('full_log', 'N/A')}"
]
return '\n'.join(details)
def main():
# Read parameters when integration is run
if len(sys.argv) < 4:
logging.error("Insufficient arguments provided. Exiting.")
sys.exit(1)
alert_file = sys.argv[1]
api_key = sys.argv[2]
hook_url = sys.argv[3]
# Read the alert file
try:
with open(alert_file) as f:
alert_json = json.load(f)
except Exception as e:
logging.error(f"Failed to read alert file: {e}")
sys.exit(1)
# Prepare alert details
alert_details = format_alert_details(alert_json)
# Convert Wazuh rule levels(0-15) -> IRIS severity(1-6)
alert_level = alert_json.get("rule", {}).get("level", 0)
if alert_level < 5:
severity = 2
elif alert_level >= 5 and alert_level < 7:
severity = 3
elif alert_level >= 7 and alert_level < 10:
severity = 4
elif alert_level >= 10 and alert_level < 13:
severity = 5
elif alert_level >= 13:
severity = 6
else:
severity = 1
# Generate request
payload = json.dumps({
"alert_title": alert_json.get("rule", {}).get("description", "No Description"),
"alert_description": alert_details,
"alert_source": "Wazuh",
"alert_source_ref": alert_json.get("id", "Unknown ID"),
"alert_source_link": "https://<IP ADDRESS>/app/wz-home", # Replace with actual Wazuh dashboard IP address
"alert_severity_id": severity,
"alert_status_id": 2, # 'New' status
"alert_source_event_time": alert_json.get("timestamp", "Unknown Timestamp"),
"alert_note": "",
"alert_tags": f"wazuh,{alert_json.get('agent', {}).get('name', 'N/A')}",
"alert_customer_id": 1, # '1' for default 'IrisInitialClient'
"alert_source_content": alert_json # raw log
})
# Send request to IRIS
try:
response = requests.post(hook_url, data=payload, headers={"Authorization": "Bearer " + api_key, "content-type": "application/json"}, verify=False)
if response.status_code in [200, 201, 202, 204]:
logging.info(f"Sent alert to IRIS. Response status code: {response.status_code}")
else:
logging.error(f"Failed to send alert to IRIS. Response status code: {response.status_code}")
except Exception as e:
logging.error(f"Failed to send alert to IRIS: {e}")
sys.exit(1)
if __name__ == "__main__":
main()
This script will help to forward alerts to DFIR-IRIS, here in this script you have to make some changes like:
- alert_source_link in the script should be set to the Wazuh dashboard's IP address. Replace <IP ADDRESS> with the actual IP address of the Wazuh dashboard.
- The alert_customer_id is assigned the value of the customer ID as shown on the DFIR-IRIS dashboard. In this example, the script is configured to forward alerts to customer ID 1. You will have to add your customer’s ID.
Step-2: Now you have to change the ownership and permissions of the /var/ossec/integrations/custom-wazuh_iris.py file.
chmod 750 /var/ossec/integrations/custom-wazuh_iris.py chown root:wazuh /var/ossec/integrations/custom-wazuh_iris.py |
Step-3: Add the following configuration to the /var/ossec/etc/ossec.conf file to send all alerts with a severity of 7 or higher to DFIR-IRIS:
<ossec_config> <!-- IRIS integration --> <integration> <name>custom-wazuh_iris.py</name> <hook_url>https://<IRIS_IP_ADDRESS>/alerts/add</hook_url> <level>7</level> <api_key><IRIS_API_KEY></api_key> <!-- Replace with your IRIS API key --> <alert_format>json</alert_format> </integration> </ossec_config> |
-You will have to make several changes like:
- Replace <IRIS_IP_ADDRESS> with the IP address of the DFIR-IRIS server. Be sure to include the port number if DFIR-IRIS isn't using the default port 443. For instance, you can use https://192.168.1.2/alerts/add if DFIR-IRIS is listening on the default HTTPS port 443, or https://192.168.1.2:8000/alerts/add if it's listening on a custom port like 8000.
- Substitute <IRIS_API_KEY> with the API key obtained from the DFIR-IRIS web console.
You can also adjust the integration to forward only alerts generated by specific rule IDs or groups to DFIR-IRIS.
Step-4: Restart the Wazuh manager to apply the changes.
systemctl restart wazuh-manager
- With this your WAZUH DFIR-IRIS integration is completed.
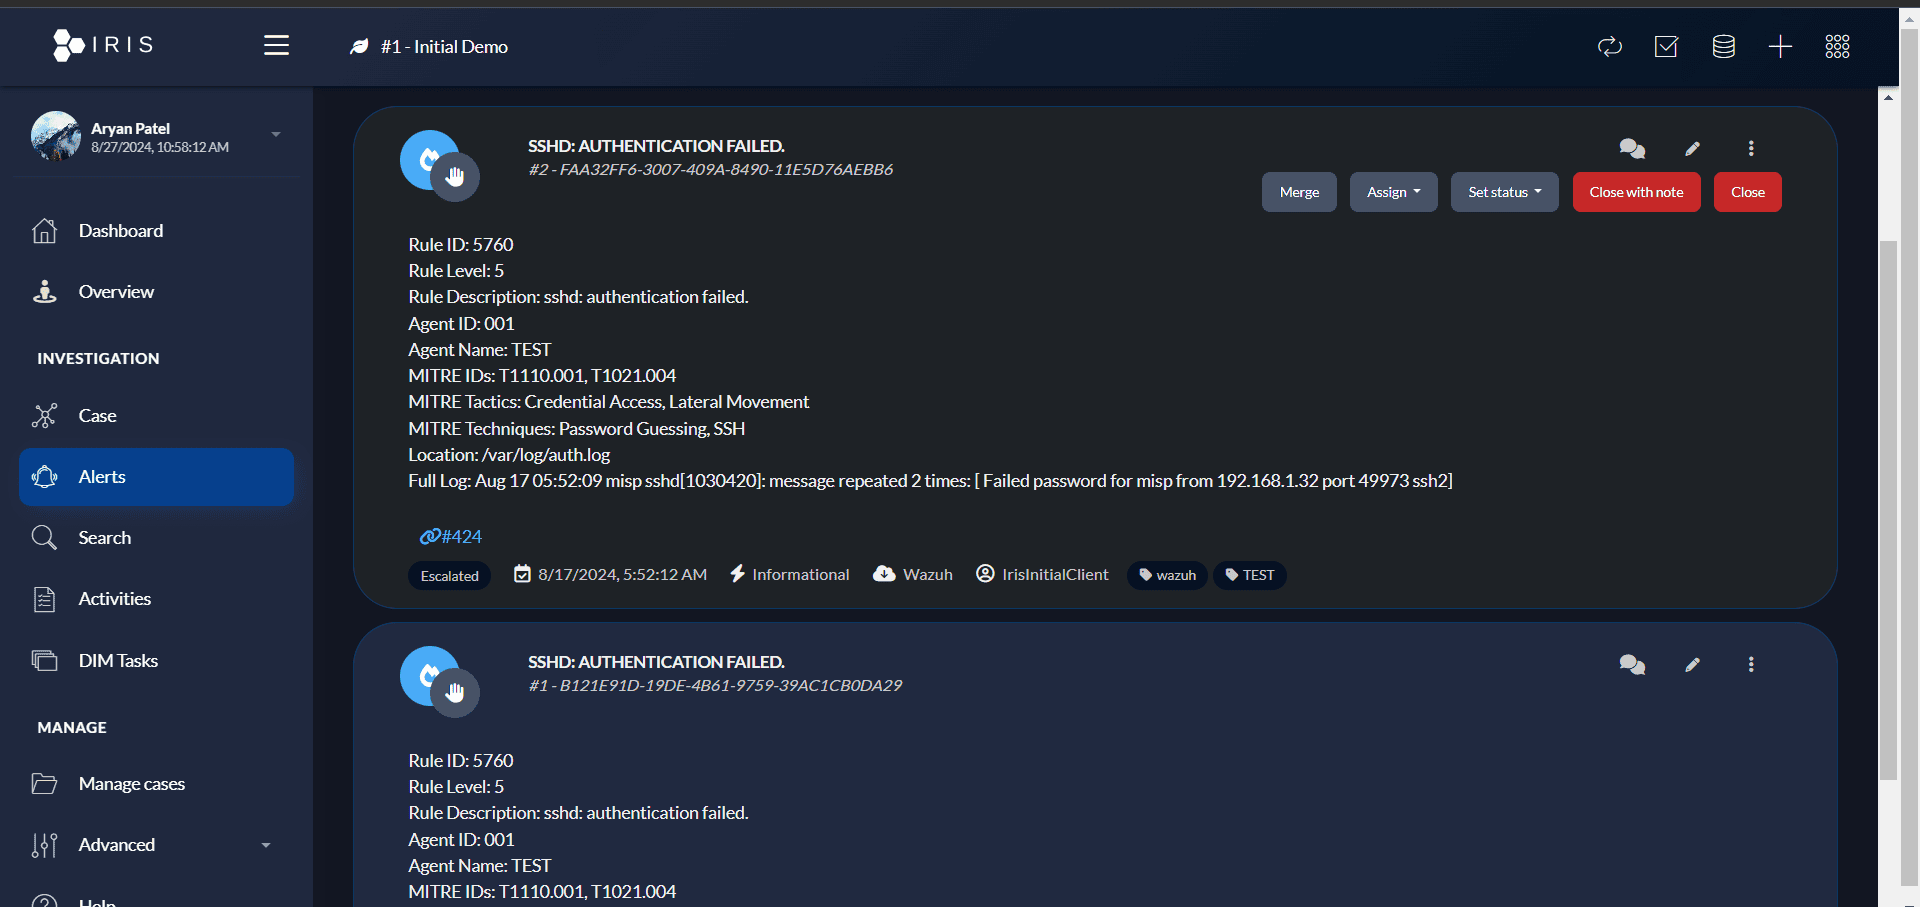
- Visualize Alerts
- As soon as an alert with a severity of 7 or higher is triggered on Wazuh, it will appear on the Alerts page of DFIR-IRIS.
Conclusion
- DFIR IRIS is a powerful, open-source tool for digital forensics and incident response, offering robust case management and seamless integration capabilities. Understanding its installation and configuration allows you to effectively manage and respond to security incidents. Integrating DFIR IRIS with Wazuh enhances Wazuh's usability for incident response. This blog provides a concise guide on installation, configuration, and Wazuh integration, with more detailed usage to follow in the next post.
Reference
SOC Analyst with expertise in incident monitoring, Configuration wazuh-server. Holds a B.Tech degree from C.K. Pithawala.
Share